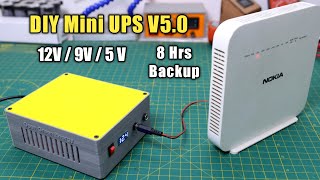
DIY Mini UPS for WiFi Router V5.0 || Multiple Outputs 12V / 9V / 5V
Channel: Open Green Energy
Category: Science & Technology
Tags: cheap upsups for raspberry piups for routerwork from home gadgetraspberrypi power supplyhome made upsdiy mini upsups for modemwork from home upsdiy back up power supply for routeramazing mini upsups circuit12v mini upsdiy power bankbackup power supply for work for homediy ups for wifi routerhow to make upsopen green energy18650 battery packcheap ups making
Description: #12vminiups #upsforWiFiRouter #WorkFromHome This video shows how to make a DIY Mini UPS for WiFi Router. I will guide you step by step on how to make a DIY Mini UPS for WiFi Router by using cheap converter modules and 18650 batteries. I am getting around 7- 8 Hours back in my WiFi Router ( 7W ). I am explaining the schematic also. Your one-stop PCB prototype Partner PCBWay: pcbway.com If you have a cool PCB project, you may participate in the 4th PCB Design Contest. bit.ly/2VGFQ4P 👉 Instructables Link: instructables.com/DIY-Mini-UPS-for-WiFi-Router-V50 👉Download 3D printed Enclosure Files (.STL ) : thingiverse.com/thing:4943348 👉 You can buy the spot welder from the following link: bit.ly/2TRmp8O *********************************************************************************************** Video Time Stamp -------------------------------------------------- 00:00 - Intro 00:50 - Parts List 01:10 - Schematic Diagram and Working 02:14 - Making of 3S battery pack with BMS 05:58 - Enclosure design and 3D printing 06:35 - Preparing the components and Wiring 09:04 - Components Installation in Enclosure 10:04 - Setting Voltage and Current 15:36 - Final Testing ---------------------------------------------------- 🔴 Instagram id link: instagram.com/opengreenenergy 🔴 My website: opengreenenergy.com Disclaimer: I cannot be held responsible for any loss of property, damage, or loss of life if it comes to that. This tutorial was written for those who have knowledge of rechargeable lithium-ion technology. Please do not attempt this if you are a novice. Stay Safe. *********************************************************************************************** Components Required : --------------------------------------- 1. 2 x XL4015 Module : amzn.to/3li1ROj / amzn.to/3mwdXVz ( Rs. 320 ) 2. Buck-Boost Converter Module: amzn.to/3kyOOKc ( Rs. 425 ) 3. 3 x DC Jack- Female :amzn.to/2FYZEG5 / amzn.to/39y9MEY ( Rs. 15 ) 4. 2 x DC Jack-Male: amzn.to/2FOhuu5 / amzn.to/39y9MEY ( Rs. 10 ) 5. 2 x Rocker Switch: amzn.to/2HVo1Xv / amzn.to/3mxfhau ( Rs. 10 ) 6. 6x 18650 Battery: banggood.in/custlink/KDmmJygJM9 ( Rs. 600 ) 7. 3S BMS: amzn.to/3DnmPWe ( Rs.180 ) 8. Double-sided tape: amzn.to/3df3REA / amzn.to/3qnbGOy ( Rs. 2 ) 9. Volt Meter: amzn.to/3nAWewT / amzn.to/3odJiwD ( Rs. 150 ) 10. 22 AWG Wires: amzn.to/3DvsGc7 ( Rs. 10 ) 11. 2x Heat Shrink Tube: amzn.to/2HZjC5G / amzn.to/39w6Pos ( Rs. 20 ) 12. 4vx 1N5822 Diode: amzn.to/2GOQRJK / amzn.to/2JyNs3g ( Rs. 20 ) 13. Fuse: amzn.to/3qkytuH / amzn.to/3fZbosL ( Rs. 2 ) 14. Fuse Holder: amzn.to/3t26m5g ( Rs. 15 ) 15. MOSFET: amzn.to/3mLqsiM ( Rs. 40 ) 16. Resistor 10K ( Rs. 1 ) 17. Insulation Ring: amzn.to/3mLl53a ( Rs.5 ) Note: The prices are as per my local store price. I have mentioned it here just for reference. Tools Used : --------------------- 1.Soldering Iron: amzn.to/2D7Ueab / amzn.to/3fWHJAl 2. Hot Glue Gun: amzn.to/2D7UeXJ /amzn.to/2JjESpn 3. Wire Cutter: amzn.to/2FPTEON / amzn.to/2L08msI 4. Wire Stripper: amzn.to/2IbUwQu /amzn.to/2L08msI 5. 3D Printer : amzn.to/2TUkxGb / amzn.to/3oi4x0u 6. Hot Air Gun: amzn.to/2OOyfcF / amzn.to/2HYpZYC 7. Nitecore Charger: amzn.to/2GBbMQW / amzn.to/2VoBmMv


